
In the previous blog, we explored the basics of CPU-based scaling using nearest neighbour and bilinear interpolation. While those methods offer speed and simplicity, they have clear limitations in visual quality. In this part, we’ll talk about bicubic interpolation, a more advanced technique, before moving on to kernel-space memory allocation strategies that can make or break real-time performance.
4. Bicubic Interpolation
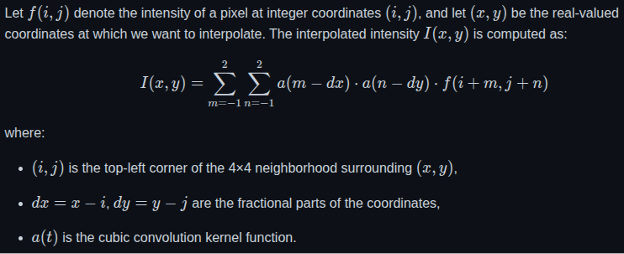
Bicubic interpolation is a more advanced image scaling technique that improves upon the results of both nearest neighbour and bilinear interpolation. It considers not just the closest 2×2 neighbourhood of known pixels (as bilinear does), but instead takes into account a 4×4 grid of pixels surrounding the unknown pixel. This makes it significantly more accurate and visually pleasing, especially when scaling images up.
The core idea behind bicubic interpolation is to use cubic convolution to calculate the intensity of a new pixel based on the intensity values of 16 nearby pixels. These 16 pixels are used to fit a smooth surface, and the resulting pixel value is derived from this surface. The method interpolates in two directions—first along one axis (e.g., x), and then along the other (e.g., y).
Mathematical Formulation:
Implementation In C
float cubicWeight(float x) {
x = (x < 0) ? -x : x;
if (x <= 1)
return (1.5f * x * x * x) – (2.5f * x * x) + 1.0f;
else if (x < 2)
return (-0.5f * x * x * x) + (2.5f * x * x) – (4.0f * x) + 2.0f;
return 0.0f;
}
void scaleResolutionBicubic(Resolution* src, Resolution* dst) {
float x_ratio = (float)src->width / dst->width;
float y_ratio = (float)src->height / dst->height;
#pragma omp parallel for collapse(2)
for (int y = 0; y < dst->height; y++) {
for (int x = 0; x < dst->width; x++) {
float srcX = x * x_ratio;
float srcY = y * y_ratio;
int xBase = (int)srcX;
int yBase = (int)srcY;
float dx = srcX – xBase;
float dy = srcY – yBase;
int dstIndex = (y * dst->width + x) * PIXEL_SIZE;
for (int c = 0; c < PIXEL_SIZE; c++) {
float value = 0.0f;
float weightSum = 0.0f;
for (int m = -1; m <= 2; m++) {
for (int n = -1; n <= 2; n++) {
int px = xBase + n;
int py = yBase + m;
// Clamp to boundary
if (px < 0) px = 0;
if (px >= src->width) px = src->width – 1;
if (py < 0) py = 0;
if (py >= src->height) py = src->height – 1;
int srcIndex = (py * src->width + px) * PIXEL_SIZE;
float weight = cubicWeight(n – dx) * cubicWeight(m – dy);
value += weight * src->data[srcIndex + c];
weightSum += weight;
}
}
dst->data[dstIndex + c] = (unsigned char)(value / weightSum);
}
}
}
}
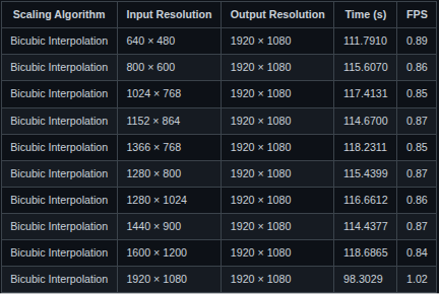
Experimentation Results:
This section presents the performance metrics of the Bicubic Interpolation algorithm:
Performance of Bicubic Interpolation on Raspberry Pi 3:

Performance of Bicubic Interpolation on i.MX 8M Mini:
Key Observations:
- Even at relatively low input resolutions like 640×480, both platforms achieve less than 1 FPS, making real-time usage difficult without hardware acceleration or further optimization
- Without hardware acceleration, it’s impractical for use cases requiring real-time video or interactive responsiveness.
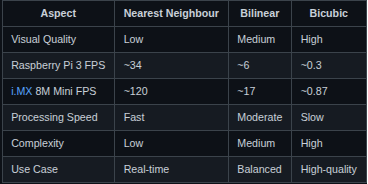
5. Comparative Analysis
After conducting detailed experimentation with all three scaling algorithms—Nearest Neighbour, Bilinear Interpolation, and Bicubic Interpolation—across multiple input resolutions, a concise comparison is presented below. This summary highlights their relative performance, visual quality, and computational complexity, helping to determine the most suitable algorithm depending on the target application’s requirements.
Compact Comparison of Scaling Algorithms:
From Beginner to Building my Own Kernel Driver
At that point, I was a complete beginner to Linux device drivers. I had no prior experience with Linux device drivers, so the learning curve was steep. My first goal was to understand memory allocation in kernel space and how to expose that memory to user space for data transfer. This section outlines the steps I followed and what I learned from each stage. Before diving into memory allocation strategies, it’s important to understand how memory is organized in a Linux system, especially in the context of kernel vs. user space.
Linux divides the virtual address space into two primary regions:
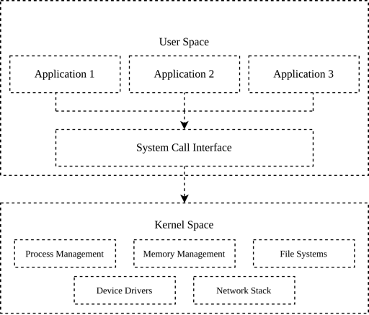
- User Space: This is where regular applications run. Each process gets its own isolated virtual address space, typically limited to a few gigabytes. Memory is allocated using functions like malloc(). While simple and convenient, these allocations are managed by the kernel’s virtual memory subsystem and may not be physically contiguous or suitable for direct hardware access (e.g., DMA).
- Kernel Space: This is where the core of the Linux operating system executes. It has direct access to hardware, and memory allocation here is much more nuanced. Allocators like kmalloc(), vmalloc(), and dma_alloc_coherent() provide different guarantees regarding contiguity, access speed, and hardware compatibility.
In kernel space, the choice of allocator depends heavily on the use case. If you need large memory regions for general computation, vmalloc() works fine. But if you’re working with hardware that performs DMA (Direct Memory Access), such as video capture or display engines, you must use physically contiguous, cache-coherent memory which is where dma_alloc_coherent() shines. Understanding this memory layout and the limitations of each allocator helped me decide when and why to transition from one allocation method to another. In the next sections, I’ll walk through that journey — starting from basic user-space allocations, all the way to advanced kernel-space DMA buffers.
Memory Allocation Strategies
1. Starting with malloc(): Simple, but Not Always Sufficient
In user space, the most common way to allocate memory is by using the malloc() function from the C standard library. It’s simple, portable, and efficient for general-purpose use. When you call malloc(), the C runtime requests memory from the kernel using system calls like brk() or mmap(), depending on the allocation size.
For example, in my scaling application, I initially used `malloc()` to allocate memory buffers for frame processing:
unsigned char* buffer = (unsigned char*)malloc(width * height * PIXEL_SIZE);
This worked fine for allocating a few megabytes of memory. It let me experiment quickly, especially during early testing. However, as I dug deeper into performance tuning and explored potential hardware acceleration paths, I started hitting the limitations of malloc().
Why malloc() isn’t good enough for Low-Level or High-Performance Applications:
- Not Physically Contiguous: malloc() returns a pointer to a virtually contiguous memory block. However, the underlying physical pages can be scattered across RAM. This isn’t a problem for typical user-space programs, but it becomes a major obstacle when working with hardware components like DMA engines, which often require physically contiguous memory blocks.
- No Control Over Caching or Coherency: Hardware-level buffer transfers, especially in video and image processing — may require explicit control over cache attributes (like turning off caching or enforcing write-through behavior). Memory allocated via malloc() gives no such control. This can lead to data inconsistency or stale reads if the CPU and hardware component access the same memory asynchronously.
- Not Suitable for DMA Transfers: DMA (Direct Memory Access) allows hardware devices to read/write memory without CPU involvement. However, DMA requires memory that is properly aligned, physically contiguous, and cache-coherent. Since malloc() doesn’t guarantee any of this, buffers allocated this way are not directly usable for DMA. At best, you’d need to copy data from malloc() buffers into DMA-safe ones which defeats the purpose of using DMA in the first place.
- Copying Overhead: Because of the incompatibility with DMA and other hardware engines, you often end up duplicating the buffer, once for user-space processing and again for hardware I/O. This extra memory copy adds latency, increases CPU usage, and wastes memory bandwidth, all of which are critical in real-time systems.
2. Transitioning to Kernel Space
After implementing the initial version of the user-space C application and allocating memory using malloc(), my manager suggested using dma_alloc_coherent() instead. The reason was that the memory used for interfacing with hardware should ideally be physically contiguous, uncached (or cache-coherent), and directly accessible by DMA engines, something that malloc() in user space cannot guarantee. To get a good grasp of kernel-space memory allocation and character driver, a minimal kernel module that registers a device file under /dev, which can be opened, read from, and written to from user space development on an x86 machine.
Here’s a simplified snippet of what that looked like in my driver:
uint8_t *input_buffer;
input_buffer = kmalloc(4096, GFP_KERNEL);
if (!input_buffer) {
pr_err(“Memory allocation with kmalloc failed\n”);
return -ENOMEM;
}
This worked well as a learning exercise. I got comfortable writing kernel code, registering character devices, and implementing file operations like open, read, and write. It also helped me understand the difference between virtual and physical memory in the kernel.
At that point, I knew kmalloc() wasn’t going to be sufficient either. This worked well for small memory regions, typically up to a page (4KB), but it’s not reliable for larger allocations due to fragmentation in physical memory. It was time to explore the next option: vmalloc(), a kernel-space allocator capable of handling larger buffers.
3. Using vmalloc(): Larger Allocations, But Still Not DMA-Friendly
After hitting the size limitations of kmalloc(), I started looking for a way to allocate larger memory buffers inside the kernel. For my application, real-time scaling at 1920×1080 resolution, I needed to allocate at least 6 MiB of memory per buffer. This ruled out kmalloc() entirely, so I turned to the next available option: vmalloc().
Unlike kmalloc(), which returns physically contiguous memory, vmalloc() returns a buffer that is virtually contiguous but not necessarily physically contiguous. This makes it well-suited for allocating large memory blocks, since it avoids the problem of physical fragmentation. Internally, vmalloc() maps a set of non-contiguous physical pages into a single contiguous virtual address space, which the kernel can work with easily.
I updated my character driver to use vmalloc() to allocate two buffers: one for input data, and one for output. Each buffer was approximately 6 MiB in size, and I also implemented an mmap() operation so these buffers could be mapped into user space for direct access by the video scaling application.
Here’s a simplified version of the allocation code from my driver:
input_buffer = vmalloc(mem_size);
output_buffer = vmalloc(mem_size);
if (!input_buffer || !output_buffer) {
pr_err(“Failed to allocate memory using vmalloc\n”);
return -ENOMEM;
}
This setup worked really well. I was finally able to allocate large enough buffers and test the complete flow of reading, scaling, and writing video frames. Performance was also acceptable for initial testing. However, this solution wasn’t perfect. While vmalloc() gave me the memory I needed, the buffers it returned were not DMA-compatible. They were not physically contiguous, and there was no guarantee of cache coherence. This meant I couldn’t use them directly with any hardware DMA engines. Once again, I found myself facing a roadblock, and this time, I knew the only remaining option was dma_alloc_coherent().
4. Using dma_alloc_coherent(): Hitting Allocation Limit and Discovering CMA
I moved on to using dma_alloc_coherent(), as originally recommended. Which is specifically designed to allocate memory that is physically contiguous, cache-coherent, and DMA-safe. This perfectly aligned with my requirements, as I needed two large non-cacheable buffers (6 MiB each) that could be directly mapped to user space for scaling. To implement this, I wrote a platform driver that registers a platform device and uses dma_alloc_coherent() to allocate the two buffers. These were later exposed to user space using dma_mmap_coherent(). I tested this driver on an x86 machine during early development, as it allowed faster iterations and easier debugging. However, while testing on x86, I encountered a significant limitation: memory allocation consistently failed when requesting anything above 4 MiB.
Here is how it looks like in my driver:
struct device *dev = &pdev->dev;
dma_buffer1 = dma_alloc_coherent(dev, DMA_BUFFER_SIZE, &dma_handle1, GFP_KERNEL);
if (!dma_buffer1) {
pr_err(“Failed to allocate memory using dma_alloc_coherent\n”);
return -ENOMEM;
}
dma_buffer2 = dma_alloc_coherent(dev, DMA_BUFFER_SIZE, &dma_handle2, GFP_KERNEL);
if (!dma_buffer2) {
pr_err(“Failed to allocate memory using dma_alloc_coherent\n”);
dma_free_coherent(dev, DMA_BUFFER_SIZE, dma_buffer1, dma_handle1);
return -ENOMEM;
}
Initially, I wasn’t sure if this was due to an issue in my code, kernel limitations, or system constraints. Upon further research, I found that others had run into similar problems, although the causes were rarely well-documented. A few kernel discussions pointed to something called the Contiguous Memory Allocator (CMA) — a kernel mechanism that reserves a physically contiguous memory region at boot time, which `dma_alloc_coherent()` can use when large memory blocks are needed.
Here’s a summary of the thought process:
The Problem:
- Allocation with dma_alloc_coherent() failed for buffer sizes > 4 MiB.
- Multiple online forums mentioned similar problems, but solutions were vague.
- I needed two non-cacheable buffers of size ~6 MiB each, usable for DMA and mappable to user space.
Initial thoughts and exploration:
- One idea was to split the 6 MiB buffer into two smaller 4 MiB chunks, and use them together (perhaps like a scatter/gather list).
- However, I wasn’t confident if this approach was technically correct or viable for my specific application.
- The more promising solution seemed to be enabling CMA support in the kernel, which allows large physically contiguous allocations.
What I discovered:
- ARM-based systems, such as the Raspberry Pi 3, often have CMA enabled by default (CONFIG_CMA=y).
- So, I tested my driver on the Raspberry Pi 3, and the allocation worked perfectly.
- I was able to allocate two 6 MiB buffers using dma_alloc_coherent() and successfully map them to user space using dma_mmap_coherent().
Experimentation Results and Performance Comparison
To evaluate the performance impact of different kernel-space memory allocation methods, I implemented two versions of the same nearest-neighbour scaling kernel module:
- One version used vmalloc() to allocate memory.
- The other used dma_alloc_coherent() with physically contiguous, non-cacheable buffers.
Both versions were tested on a Raspberry Pi 3, using a fixed output resolution of 1920×1080, and a range of input resolutions. Each test consisted of 100 iterations of the read → scale → write pipeline in kernel space.
These are the results of both Implementations:
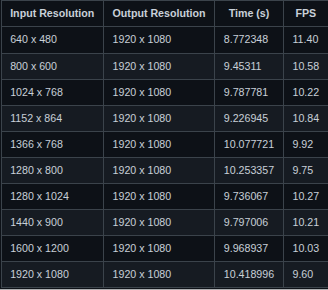
Nearest Neighbour Scaling on Raspberry Pi 3 using dma_alloc_coherent()
Nearest Neighbour Scaling on Raspberry Pi 3 using vmalloc()
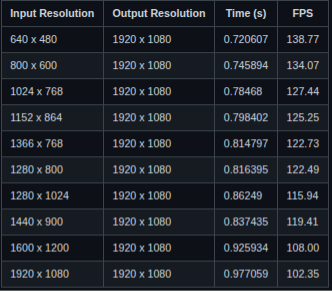
The experimental results revealed a surprising but consistent trend: the implementation that used vmalloc() outperformed the one that used dma_alloc_coherent() in terms of frames per second (FPS) for CPU-based image scaling. For instance, when scaling from 1920×1080 to 1920×1080, the vmalloc() version achieved over 102 FPS, whereas the dma_alloc_coherent() version managed only around 9.6 FPS. At first, this was counterintuitive. dma_alloc_coherent() is designed to allocate physically contiguous memory that is optimized for DMA operations. Naturally, one would expect it to offer better performance characteristics. However, during a technical discussion with my manager, we analyzed the underlying reasons for this behavior and identified CPU caching as the key factor.
Memory allocated with dma_alloc_coherent() is typically marked as non-cacheable to maintain coherency with hardware DMA engines. This means that every access to such memory bypasses the CPU’s cache and goes directly to RAM, resulting in significantly higher memory access latency. While this is crucial for hardware-based transfers where cache incoherency would lead to data corruption, it is a performance bottleneck for CPU-only workloads. On the other hand, `vmalloc()`-allocated memory is cacheable by default. This allows the CPU to leverage its cache hierarchy effectively, benefiting from fast memory access, cache line prefetching, and overall reduced latency. Since my application performs all image scaling operations in software, without any involvement from DMA engines, the cacheable nature of vmalloc()-ed memory leads to much faster execution.
From this, I concluded that for CPU-bound image processing tasks, vmalloc() is a more suitable choice compared to dma_alloc_coherent(). The latter should be reserved for cases where DMA compatibility is essential, such as when interfacing with hardware peripherals. This distinction not only explains the performance results but also highlights the importance of understanding memory attributes and choosing allocation strategies based on the intended usage context.
Acknowledgements
This work benefited from discussions, feedback, and suggestions provided by multiple colleagues and mentors throughout its development. The term “manager” is used in a broad sense to acknowledge everyone who contributed to the direction, clarity, and refinement of this work.
The following resources were especially helpful in understanding key concepts and implementation strategies:
- https://embetronicx.com/linux-device-driver-tutorials/
- https://docs.kernel.org/
- The Cubic α-Catmull-Rom Spline, Mathematical and Computational Applications, by Juncheng Li and Sheng Chen.
Code Repository
You can find the complete source code and experiments at my GitHub repository:
https://github.com/harshel721/cpu-based-experiments
👉 Connect with us to explore how Vayavya Labs can help optimize your embedded software pipelines. Write to us at sales@vayavyalabs.com